Dot Circle – An Introduction to Vectors
After learning from Jessica Murk before our spring break about the idea of revising mathematical writing in class, I decided to try it as part of an introduction to the fourth topic in the IB Mathematics curriculum: vectors. The goal was to build a need for the information given by vectors and how they provide mathematical structure in a productive way.
I started by adapting Dan Meyer’s activity here with a new set of dots.
I asked all students to pick one dot, and then asked a student to give the class instructions on which one they picked. They did a pretty good job with it, but there was quite a bit of ambiguity in their verbal descriptions, as I wanted. This is when I sprung Dan’s helpful second slide that made this process much easier:

Key Point #1: A common language or vocabulary makes it easy for us to communicate our ideas.
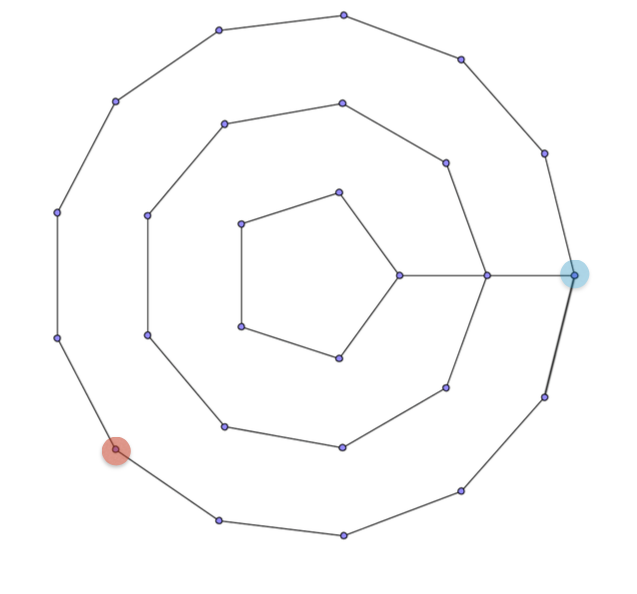
I then moved on to the next task. Students individually had to write directions for moving from the red dot to the blue dot. I gave them this one to start as a verbal task, but nobody was willing to take the bait after the last activity:

Fair enough.
I then gave one of the following images to each pairs of students, with nothing more than the same instruction to write directions from the red to the blue dot.
Here is a sampling:
- Move across 5 dots on the outermost layer counter-clockwise, with the blue dot at the bottom of paper (closest to you)
- Move 7 units to right, and move about (little less) 3 units up so that the blue dot is right on the vertical line
- Fin the dot that is directly opposite to the red dot that is across the diagram. Once there, move down one dot along the outermost layer of dots.
- Stay on the circle and move right for five units
- Move from coordinate $latex \frac{7 \pi}{6}$ to the coordinate of $latex 2 \pi$ on the unit circle.
After putting the written descriptions next to the matching image, students then rotated from image to image, and applied Jessica’s framework for students giving written feedback for each description they saw.
Here is some of the feedback they provided:

Then, without any input from me, I had students sit down and each write a new description. Just as Jessica promised, the descriptions were improved after students saw the work of others and focused on what it means to give specific and unambiguous directions.
This is where I hijacked the results for my own purposes. I asked how the background information I gave helped in this task? They responded with:
- Grid/coordinate system in background of the dots
- Circle connecting dots – use directions and circles to explain how to move
- Connected all dots – move certain number of ‘units’
One student also provided a useful statement that the best description was one that could not be misinterpreted. I identified the blue dot as (3,0), and asked if anyone could give coordinates for the red dot. Nobody could. One student asked where (0,0) was. I pointed to some other points as examples, and eventually a student identified the red dot as (3,8). Another said it could also be (3,-5). I pointed out that if I had asked students to plot (3,-5) at the beginning of the class, the answer would have been totally different.
This all got us to think about what information is important about coordinates, what they tell us, and that if we agree on common units and a starting point, the rest can be interpreted from there. This was a perfect place to introduce the concept of unit vectors.
We certainly spent some time wandering in the weeds, but this ended up being a really fun way to approach the new unit.
If you are interested, here is the PDF containing all of the slides:
Point Circle


I love this! “The best description was one that could not be misinterpreted.” Brilliant! I love seeing the use, impact, and effectiveness of the feedback! Bravo, Evan! Keep up the great work!