#MakeoverMonday – Sun Room Carpet

This is my attempt to revise the textbook problem Dan Meyer posted here:

The task:
130626_1

What I did:

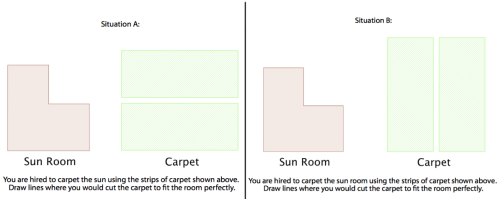
  • Bring the most interesting part of the problem (to me) to the front of the task. The idea of requiring the seams to go in the same direction with a minimum number of seams is the only opening for multiple answers in this problem. Start with this, and the students will already have a chance to disagree about answers, which we know is a good way to get conversations going.
  • Frame this possibility of multiple arrangements visually, not with text. By placing the carpet strips in different configurations when first displaying the task, I’m nudging students toward different answers. Again, this conflict is important to spicing up a pretty plain textbook task.
  • Get rid of those mixed metric/English units immediately. There is no reason that a person would measure the room in meters and then deal with a store that sells in feet and yards. There’s enough here to keep things interesting without dealing with meters and yards.
  • Leave out unnecessary vocabulary like ‘bolt’ and ‘seam’. One more move to reduce the text overload of the problem.

Here’s the rundown of the lesson:

Hand out slips of paper with either Situation A or Situation B shown below.

Screen Shot 2013-06-28 at 8.15.29 AM

Once students have drawn their lines, share a few of the drawings to show the differences. Pose the question: Which situation (A or B) will require more cutting?

Have students make and record their guesses.

Move to the second act here. What information would you need to answer the question precisely?

There’s some wiggle room here for what happens next. If the students ask for the measurements, you could give them this diagram:
Screen Shot 2013-06-28 at 8.21.26 AM

In reality though, students could figure this out just by making measurements with a ruler on the diagram. No big deal either way.

We then ratchet up the task by bringing up the tape factor:
Screen Shot 2013-06-28 at 8.27.26 AM

The students might not realize that the carpet is attached at the edges of the room (though not usually with tape) which is why it’s important to bring up this point. At this point the dimensions diagram still might be requested, but it isn’t really necessary until students start reporting their answers. What units are involved?

It would be at this stage when I would actually ask the students which situation is the better option for carpeting the room. The ambiguity is on purpose – students need to decide what it really means for a situation to be better. Is it cost? Time required to cut? Amount of tape? All of these factors come into play. The original problem ultimately asks what the total cost is for the carpet and the tape, but there are lots of possibilities for what can be done at this point in the lesson. Here are some possibilities:

At the hardware store, you learn the following:

  • A 30 foot roll of double sided tape costs $4.85
  • The carpet sells for $22.95 per square yard
  • What is the minimum cost to carpet the room?

Or, building on that information:

Suppose you also make $11.50 per hour to lay carpet.

Which situation do you choose to maximize the money you make on the job? What information would you need to answer this question?

Having students work to answer this efficiently means getting students that have worked on the two situations to talk to each other.

Follow up questions to throw in:

  • If you had a choice of 3, 5, or 12 foot wide strips of carpet, which would result in the cheapest overall job
  • If you can cut the carpet at 2.5 inches/second for a straight cut, with an additional second for each cut, how long would it take for you to prep the carpet for the room?

This is my first attempt in the Make over Monday series, and I’m exhausted. Also, this was fun. What’s next, Dan?

Tea with Lee Magpili and the LEGO Mindstorms EV3

Though my schedule being back in the US this summer has been busy, when I learned that Lee Magpili was going to be in town, I cleared my schedule. I first met Lee when I was working with the Bronx FIRST LEGO League initiative several years ago. He was a quiet presence in comparison to the energetic middle school students that attended our workshops to play with LEGO robots, but I quickly learned of his prowess with building with LEGO elements. His rovers navigated the FLL field with ease and used mechanisms that balanced simplicity with effectiveness. Eventually he mentored an FLL team to do exceptionally well. Like all great FLL coaches, however, he insisted on the students doing the work. In our conversations at that time, I quickly understood that Lee believed (and continues to believe) that LEGO is an amazing platform upon which to learn an enormous range of useful skills. Robotics, in particular, capitalizes on the unique blend of play and learning through LEGO to get students to understand the engineering design process. Lee is a believer in the potential for students to be quickly engaged and motivated to work hard when the right tools are around.

It was consequently no surprise when I learned Lee had been selected for a job with LEGO education in Denmark a couple of years ago. He and I wrote back and forth periodically about the position and what it entailed, but for a while our conversations turned noticeably away from the details of his work. I figured this was just a consequence of the distance and I left it at that.

This ended last January with the announcement of the LEGO Mindstorms EV3. When Lee posted a link to the announcement on Facebook, I suddenly understood. It made me realize that like any good designer, he kept his ideas secret until they were ready to share with the world. (I assume a pretty airtight NDA was also involved.)

Lee sat down with me at Saints Alp Teahouse in New York for some bubble tea, snacks, and conversation about the EV3. What struck me was that Lee’s enthusiasm for using LEGO as a learning tool hasn’t just been maintained, it has grown considerably since becoming part of the EV3 team. As you might also expect, he was excited to show me the bits and pieces of the kit that will be coming out in August.

20130627-075548.jpg

From a LEGO designer’s perspective, the attention to detail in acknowledging the desires of the LEGO fan community and the limitations of the NXT set will most definitely be appreciated. There are some subtle changes that made me excited given my own experiences building with the curves of the NXT and its parts.

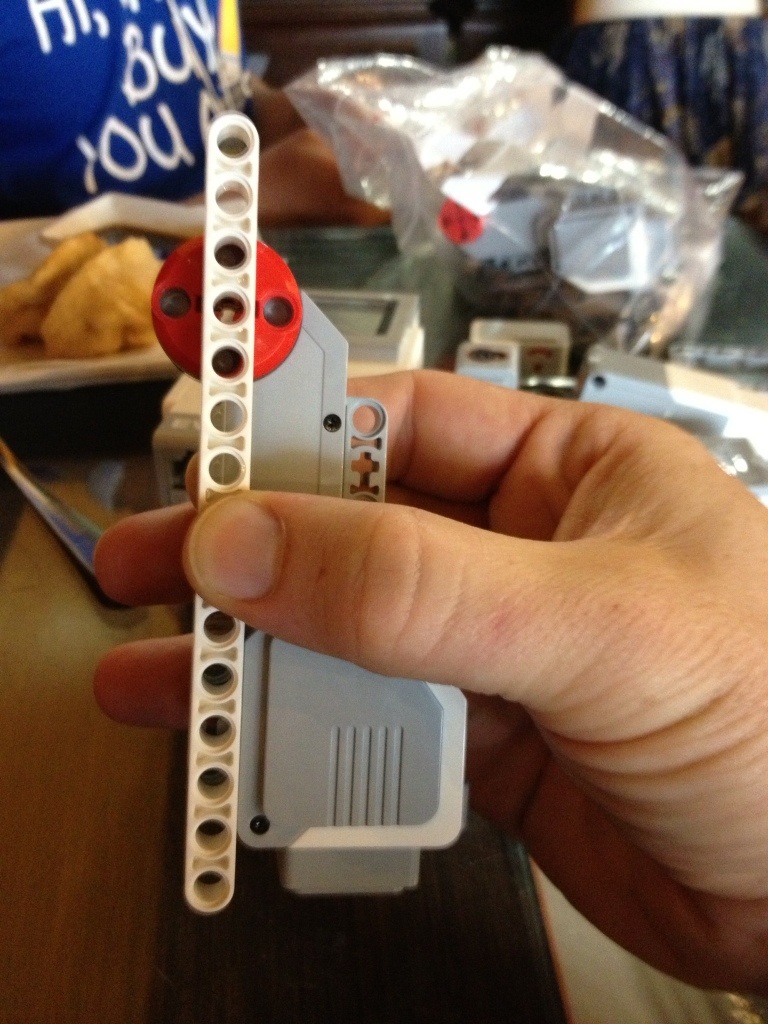
For example, a reshaping of the motor has made it much easier to attach pins and secure it to designs:

20130627-075218.jpg

Sensors can be attached using a single pin if needed:

20130627-075029.jpg

I also suspect that many people will discover ways that alignment between different components will be much easier with the new set:

20130627-075319.jpg

Lee also spoke a lot about the care that he and the team have taken to make the bar for entry with the kit low, and the ceiling high. The education kit will include instructions for building modules that can be used in different designs. A conveyor belt doubles as a set of tracks. A motor-wheel module can be built that is sturdy but easy to build upon. This will help students (and teachers) minimize the frustration that inevitably occurs when straying from build instructions to pursue an idea for a new design. The strengths associated with building with Technics parts will be a lot more intuitive to newcomers that may have only worked with bricks.

I am excited to get my hands on one of these kits. In my robotics class this year, students grew considerably in their ability to conjure up a design and make it happen with the bricks. Students often got frustrated by the curves of the NXT motors getting in the way of their designs. The ease of attaching motors directly to the programmable brick of the EV3 will make it even easier to get students learning programming techniques. The on brick features for prototyping and programming will make things much easier for trying out quick ideas, especially on an FLL field.

It was good catching up with Lee – he is a person to watch in the world of LEGO Education. He was at the FIRST World Festival to demonstrate the EV3 to FIRST LEGO League teams, not to mention members of the Board of Directors at the LEGO group. He told me that his plans include photographing Gyro Boy in Times Square and Washington Square Park. Though he assures me that the robot named ‘Evan’ that has been touring the world to demonstrate the EV3 is not named after me, I’m going to continue to assume that it is.

2012-2013 Year In Review – Learning Standards

This is the second post reflecting on this past year and I what I did with my students.

My first post is located here. I wrote about this year being the first time I went with standards based grading. One of the most important aspects of this process was creating the learning standards that focused the work of each unit.

What did I do?

I set out to create learning standards for each unit of my courses: Geometry, Advanced Algebra (not my title – this was an Algebra 2 sans trig), Calculus, and Physics. While I wanted to be able to do this for the entire semester at the beginning of the semester, I ended up doing it unit by unit due to time constraints. The content of my courses didn’t change relative to what I had done in previous years though, so it was more of a matter of deciding what themes existed in the content that could be distilled into standards. This involved some combination of concepts into one to prevent the situation of having too many. In some ways, this was a neat exercise to see that two separate concepts really weren’t that different. For example, seeing absolute value equations and inequalities as the same standard led to both a presentation and an assessment process that emphasized the common application of the absolute value definition to both situations.

What worked:

  • The most powerful payoff in creating the standards came at the end of the semester. Students were used to referring to the standards and knew that they were the first place to look for what they needed to study. Students would often ask for a review sheet for the entire semester. Having the standards document available made it easy to ask the students to find problems relating to each standard. This enabled them to then make their own review sheet and ask directed questions related to the standards they did not understand.
  • The standards focus on what students should be able to do. I tried to keep this focus so that students could simultaneously recognize the connection between the content (definitions, theorems, problem types) and what I would ask them to do with that content. My courses don’t involve much recall of facts and instead focus on applying concepts in a number of different situations. The standards helped me show that I valued this application.
  • Writing problems and assessing students was always in the context of the standards. I could give big picture, open-ended problems that required a bit more synthesis on the part of students than before. I could require that students write, read, and look up information needed for a problem and be creative in their presentation as they felt was appropriate. My focus was on seeing how well their work presented and demonstrated proficiency on these standards. They got experience and got feedback on their work (misspelling words in student videos was one) but my focus was on their understanding.
  • The number standards per unit was limited to 4-6 each…eventually. I quickly realized that 7 was on the edge of being too many, but had trouble cutting them down in some cases. In particular, I had trouble doing this with the differentiation unit in Calculus. To make it so that the unit wasn’t any more important than the others, each standard for that unit was weighted 80%, a fact that turned out not to be very important to students.

What needs work:

  • The vocabulary of the standards needs to be more precise and clearly communicated. I tried (and didn’t always succeed) to make it possible for a student to read a standard and understand what they had to be able to do. I realize now, looking back over them all, that I use certain words over and over again but have never specifically said what it means. What does it mean to ‘apply’ a concept? What about ‘relate’ a definition? These explanations don’t need to be in the standards themselves, but it is important that they be somewhere and be explained in some way so students can better understand them.
  • Example problems and references for each standard would be helpful in communicating their content. I wrote about this in my last post. Students generally understood the standards, but wanted specific problems that they were sure related to a particular standard.
  • Some of the specific content needs to be adjusted. This was my first year being much more deliberate in following the Modeling Physics curriculum. I haven’t, unfortunately, been able to attend a training workshop that would probably help me understand how to implement the curriculum more effectively. The unbalanced force unit was crammed in at the end of the first semester and worked through in a fairly superficial way. Not good, Weinberg.
  • Standards for non-content related skills need to be worked in to the scheme. I wanted to have some standards for year or semester long skills standards. For example, unit 5 in Geometry included a standard (not listed in my document below) on creating a presenting a multimedia proof. This was to provide students opportunities to learn to create a video in which they clearly communicate the steps and content of a geometric proof. They could create their video, submit it to me, and get feedback to make it better over time. I also would love to include some programming or computational thinking standards as well that students can work on long term. These standards need to be communicated and cultivated over a long period of time. They will otherwise be just like the others in terms of the rush at the end of the semester. I’ll think about these this summer.

You can see my standards in this Google document:
2012-2013 – Learning Standards

I’d love to hear your comments on these standards or on the post – comment away please!

2012-2013 Year In Review – Standards Based Grading

This is the first in a series of posts about things I did with my classes this year.

When I made the decision last fall to commit to standards based grading, these were the main unknowns that hung at the back of my mind:

  • How would students respond to the change?
  • How would my own use of SBG change over the course of the year?
  • How would using SBG change the way I plan, teach, and assess?

These questions will all be answered as I reflect in this post.

What did I do?

In the beginning of the year, I used a purely binary system of SBG – were students proficient or not? If they were proficient, they had a 5/5. Not yet proficient students received a 0/5 for a given standard. All of these scores included a 5 point base grade to be able to implement this in PowerSchool.

As the semester went on, the possible proficiency levels changed to a 0, 2.5, or 5. This was in response to students making progress in developing their skills (and getting feedback on their progress through Blue Harvest but not seeing visible changes to their course grade. As much as I encouraged students not to worry about the grade, I also wanted to be able to show progress through the breakdown of each unit’s skills through PowerSchool. It served as a communication channel to both parents and the students on what they were learning, and I could see students feeling a bit unsatisfied by getting a few questions correct, but not getting marked as proficient yet. I also figured out that I needed to do more work defining what it meant to be proficient before I could really run a binary system.

By the start of the second semester, I used this scheme for the meaning of each proficiency score:

  • 1 – You’ve demonstrated basic awareness of the vocabulary and definitions of the standard. You aren’t able to solve problems from start to finish, even with help, but you can answer yes/no or true or false questions correctly about the ideas for this standard.
  • 2 – You can solve a problem from start to finish with your notes, another student, or your teacher reminding you what you need to do. You are not only able to identify the vocabulary or definitions for a given skill, but can substitute values and write equations that can be solved to find values for definitions. If you are unable to solve an equation related to this standard due to weak algebra skills, you won’t be moving on to the next level on this standard.
  • 3 – You can independently solve a question related to the standard without help from notes, other students, or the teacher. This score is what you receive when you do well on a quiz assessing a single standard. This score will also be the maximum you will receive on this standard if you consistently make arithmetic or algebraic errors on problems related to this standard.
  • 4 – You have shown you can apply concepts related to this standard on an in-class exam or in another situation where you must identify which concepts are involved in solving a problem. This compares to success on a quiz on which you know the standard being assessed. You can apply the content of a standard in a new context that you have not seen before. You can clearly explain your reasoning, but have some difficulty using precise mathematical language.
  • 5 – You have met or exceeded the maximum expectations for proficiency on this standard. You have completed a project of your own design, written a program, or made some other creative demonstration of your ability to apply this standard together with other standards of the unit. You are able to clearly explain your reasoning in the context of precise mathematical definitions and language.

All of the standards in a unit were equally weighted. All units had between 5 and 7 standards. In most classes, the standards grade was 90% of the overall course grade, the exception being AP Calculus and AP Physics, where it was 30%. In contrast to first semester, students needed to sign up online for any standards they wanted to retake the following day. The maximum number of standards they could retake in a day was limited to two. I actually held students to this (again, in contrast to first semester), and I am really glad that I did.

Before I start my post, I need to thank Daniel Schneider for his brilliant post on how SBG changes everything here. I agree with the majority of his points, and will try not to repeat them below.

What worked:

  • Students were uniformly positive about being able to focus on specific skills or concepts separate from each other. The clarity of knowing that they needed to know led some students to be more independent in their learning. Some students made the conscious decision to not pursue certain standards that they felt were too difficult for them. The most positive aspect of their response was that students felt the system was, above all else, a fair representation of their understanding of the class.
  • Defining the standards at the beginning of the unit was incredibly useful for setting the course and the context for the lessons that followed. While I have previously spent time sketching a unit plan out of what I wanted students to be able to do at the end, SBG required me not only to define specifically what my students needed to do, but also to communicate that definition clearly to students. That last part is the game changer. It got both me and the students defining and exploring what it means to be proficient in the context of a specific skill. Rather than saying “you got these questions wrong”, I was able to say “you were able to answer this when I was there helping you, but not when I left you alone to do it without help. That’s a 2.”
  • SBG helped all students in the class be more involved and independent in making decisions about their own learning. The strongest students quickly figured out the basics of each standard and worked to apply them to as many different contexts as possible. They worked on communicating their ideas and digging in to solve difficult problems that probed the edges of their understanding. The weaker students could prioritize those standards that seemed easiest to them, and often framed their questions around the basic vocabulary, understanding definitions, and setting up a plan to a problem solution without necessarily knowing how to actually carry out that plan. I also changed my questions to students based on what I knew about their proficiency, and students came to understand that I was asking a level 1 question compared with a level 3 question. I also had some students giving a standards quiz back to me after deciding that they knew they weren’t ready to show me what they knew. They asked for retakes later on when they were prepared. That was pretty cool.
  • Every test question was another opportunity to demonstrate proficiency, not lose points. It was remarkably freeing to delete all of the point values from questions that I used from previous exams. Students also responded in a positive way. I found in some cases that because students weren’t sure which standard was being assessed, they were more willing to try on problems that they might have otherwise left blank. There’s still more work to be done on this, but I looked forward to grading exams to see what students did on the various problems. *Ok, maybe look forward is the wrong term. But it still was really cool to see student anxiety and fear about exams decrease to some extent.

What needs work:

  • Students want more detail in defining what each standard means. The students came up with the perfect way to address this – sample problems or questions that relate to each standard. While the students were pretty good at sorting problems at the end of the unit based on the relevant standards, they were not typically able to do this at the beginning. The earlier they understand what is involved in each standard, the more quickly they can focus their work to achieve proficiency. That’s an easy order to fill.
  • I need to do more outreach to parents on what the standards mean. I thought about making a video at the beginning of the year that showed the basics, but I realize now that it took me the entire year to understand exactly what I meant by the different standards grades. Now that I really understand the system better, I’ll be able to do an introduction when the new year begins.
  • The system didn’t help those students that refuse to do what they know they need to do to improve their learning. This system did help in helping these students know with even more clarity what they need to work on. I was not fully effective in helping all students act on this need in a way that worked for them.
  • Reassessment isn’t the ongoing process that it needs to be. I had 80 of the 162 reassessment requests for this semester happen in the last week of the semester. Luckily I made my reassessment system in Python work in time to make this less of a headache than it was at the end of the first semester. I made it a habit to regularly give standards quizzes between 1 or 2 classes after being exposed to the standard for the first time. These quizzes did not assess previous standards, however, so a student’s retake opportunities were squarely on his or her own shoulders. I’m not convinced this increased responsibility is a problem, but making it an ongoing part of my class needs to be a priority for planning the new year.

I am really glad to have made the step to SBG this year. It is the biggest structural change I’ve made to my grading policy ever. It led to some of the most candid and productive conversations with students about the learning learning process that I’ve ever had. I’m going to stop with the superlatives, even though they are warranted.

Visualizing the invisible – standing waves

I wrote a post more than a year ago on a standing waves lesson I did. Today I repeated that lesson with a few tweaks to maximize time spent looking at frequency space of different sounds. The Tuvan throat singers, a function generator, and a software frequency generator (linked here) again all made an appearance.

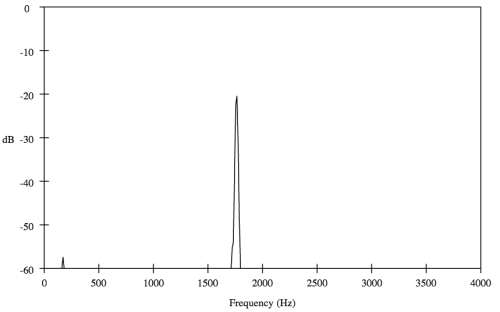
We focused on the visceral experience of listening to pure, single frequency sound and what it meant. We listened for the resonant frequencies of the classroom while doing a sweep of the audible spectrum. We looked at the frequency spectrum of noises that sounded smooth (sine wave) compared to grating (sawtooth). We looked at frequencies of tuning forks that all made the same note, but at different octaves, and a student had the idea of looking at ratios. That was the golden idea that led to interesting conclusions while staring at the frequency spectrum.

Here is a whistle:
Screen Shot 2013-05-13 at 3.10.40 PM
…a triangle wave (horizontal axis measured in Hz):

Screen Shot 2013-05-13 at 3.09.45 PM

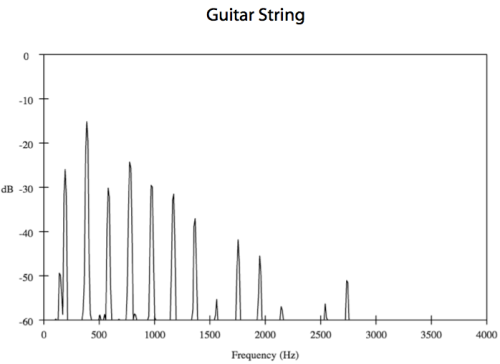
…a guitar string (bonus points if you identify which string it was:
Screen Shot 2013-05-13 at 3.12.14 PM

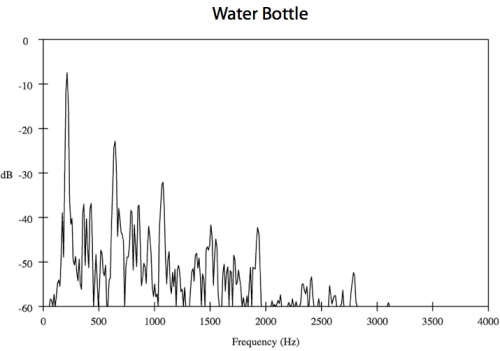
…and blowing across the rim of a water bottle:
Screen Shot 2013-05-13 at 3.14.04 PM

The ratios of frequencies for the guitar string are integer multiples of the fundamental – this is easily derived using a diagram and an equation relating a wave’s speed, frequency, and wavelength. It’s also easily seen in the spectrum image – all harmonics equally spaced with each other and with the origin. The bottle, closely modeled by a tube closed at one end, has odd multiples of the fundamental. Again, this is totally visible in the image above of the spectrum.

I’m just going to say it here: if you are teaching standing waves and are NOT using any kind of frequency analyzer of some sort to show your students what it means to vibrate at multiple frequencies at once, you are at best missing out, and at worst, doing it plain wrong.

Rethinking the headache of reassessments with Python

One of the challenges I’ve faced in doing reassessments since starting Standards Based Grading (SBG) is dealing with the mechanics of delivering those reassessments. Though others have come up with brilliant ways of making these happen, the design problem I see is this:

  • The printer is a walk down the hall from my classroom, requires an ID swipe, and possibly the use of a paper cutter (in the case of multiple students being assessed).
  • We are a 1:1 laptop school. Students also tend to have mobile devices on them most of the time.
  • I want to deliver reassessments quickly so I can grade them and get them back to students immediately. Minutes later is good, same day is not great, and next day is pointless.
  • The time required to generate a reassessment is non-zero, so there needs to be a way to scale for times when many students want to reassess at the same time. The end of the semester is quickly approaching, and I want things to run much more smoothly this semester in comparison to last.

I experimented last fall with having students run problem generators on their computers for this purpose, but there was still too much friction in the system. Students forgot how to run a Python script, got errors when they entered their answers incorrectly, and had scripts with varying levels of errors in them (and their problems) depending on when they downloaded their file. I’ve moved to a web form (thanks Kelly!) for requesting reassessments the day before, which helps me plan ahead a bit, but I still find it takes more time than I think it should to put these together.

With my recent foray into web applications through the Bottle Python framework, I’ve finally been able to piece together a way to make this happen. Here’s the basic outline for how I think I see this coming together – I’m putting it in writing to help make it happen.

  • Phase 1 – Looking Good: Generate cleanly formatted web pages using a single page template for each quiz. Each page should be printable (if needed) and should allow for questions that either have images or are pure text. A function should connect a list of questions, standards, and answers to a dynamic URL. To ease grading, there should be a teacher mode that prints the answers on the page.
  • Phase 2 – Database-Mania: Creation of multiple databases for both users and questions. This will enable each course to have its own database of questions to be used, sorted by standard or tag. A user can log in and the quiz page for a particular day will automatically appear – no emailing links or PDFs, or picking up prints from the copier will be necessary. Instead of connecting to a list of questions (as in phase 1) the program will instead request that list of question numbers from a database, and then generate the pages for students to use.
  • Phase 3 – Randomization: This is the piece I figured out last fall, and it has a couple components. The first is my desire to want to pick the standard a student will be quizzed on, and then have the program choose a question (or questions) from a pool related to that particular standard. This makes reassessments all look different for different students. On top of this, I want some questions themselves to have randomized values so students can’t say ‘Oh, I know this one – the answer’s 3/5’. They won’t all be this way, and my experience doing this last fall helped me figure out which problems work best for this. With this, I would also have instant access to the answers with my special teacher mode.
  • Phase 4 – Sharing: Not sure when/if this will happen, but I want a student to be able to take a screenshot of their work for a particular problem, upload it, and start a conversation about it with me or other students through a URL. This will also require a new database that links users, questions, and their work to each other. Capturing the conversation around the content is the key here – not a computerized checker that assigns a numerical score to the student by measuring % wrong, numbers of standards completed, etc.

The bottom line is that I want to get to the conversation part of reassessment more quickly. I preach to my students time and time again that making mistakes and getting effective feedback is how you learn almost anything most efficiently. I can have a computer grade student work, but as others have repeatedly pointed out, work that can be graded by a computer is at the lower level of the continuum of understanding. I want to get past the right/wrong response (which is often all students care about) and get to the conversation that can happen along the way toward learning something new.

Today I tried my prototype of Phase 1 with students in my Geometry class. The pages all looked like this:

Image

I had a number of students out for the AP Mandarin exam, so I had plenty of time to have conversations around the students that were there about their answers. It wasn’t the standard process of taking quiz papers from students, grading them on the spot, and then scrambling to get around to have conversations over the paper they had just written on. Instead I sat with each student and I had them show me what they did to get their answers. If they were correct, I sometimes chose to talk to them about it anyway, because I wanted to see how they did it. If they had a question wrong, it was easy to immediately talk to them about what they didn’t understand.

Though this wasn’t my goal at the beginning of the year, I’ve found that my technological and programming obsessions this year have focused on minimizing the paperwork side of this job and maximizing opportunities for students to get feedback on their work. I used to have students go up to the board and write out their work. Now I snap pictures on my phone and beam them to the projector through an Apple TV. I used to ask questions of the entire class on paper as an exit ticker, collect them, grade them, and give them back the next class. I’m now finding ways to do this all electronically, almost instantly, and without requiring students to log in to a third party website or use an arbitrary piece of hardware.

The central philosophy of computational thinking is the effort to utilize the strengths of  computers to organize, iterate, and use patterns to solve problems.  The more I push myself to identify my own weaknesses and inefficiencies, the more I am seeing how technology can make up for those negatives and help me focus on what I do best.

Assessing assessment over time – similar triangles & modeling

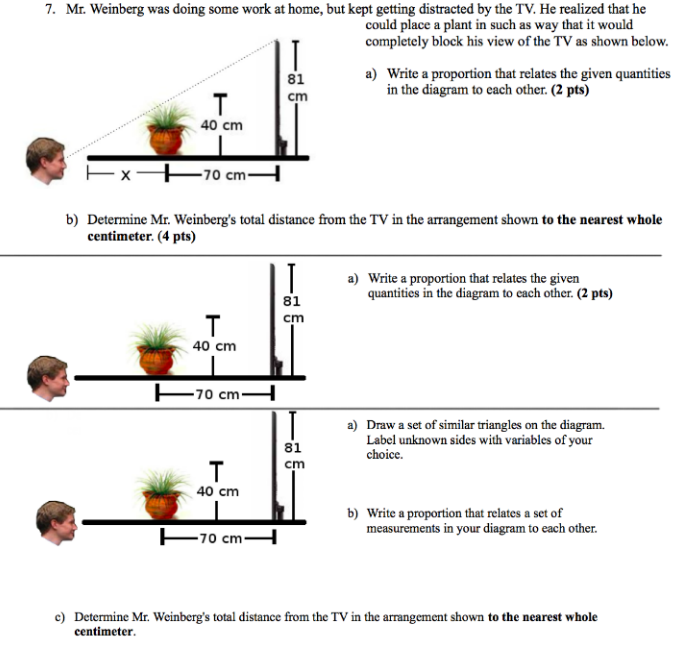
I’ve kept a question on my similar triangles unit exam over the past three years. While the spirit has generally been the same, I’ve tweaked it to address what seems most important about this kind of task:
Screen Shot 2013-04-30 at 3.27.28 PM

My students are generally pretty solid when it comes to seeing a proportion in a triangle and solving for an unknown side. A picture of a tree with a shadow and a triangle already drawn on it is not a modeling task – it is a similar triangles task. The following two elements of the similar triangles modeling concept seem most important to me in the long run:

  • Certain conditions make it possible to use similar triangles to make measurements. These conditions are the same conditions that make two triangles similar. I want my students to be able to use their knowledge of similarity theorems and postulates to complete the statement: “These triangles in the diagram I drew are similar because…”
  • Seeing similar triangles in a situation is a learned skill. Dan Meyer presented on this a year ago, and emphasized that a traditional approach rushes the abstraction of this concept without building a need for it. The heavy lifting for students is seeing the triangles, not solving the proportions.

If I can train students to see triangles around them (difficult), wonder if they are similar (more difficult), and then have confidence in knowing they can/can’t use them to find unknown measurements, I’ve done what I set out to do here. What still seems to be missing in this year’s version is the question of whether or not they actually are similar, or under what conditions are they similar. I assessed this elsewhere on the test, but it is so important to the concept of mathematical modeling as a lifestyle that I wish I had included it here.

Coding IS a super(edu)power

I’ve been really impressed by the Dan Meyer/Dave Major collaboration. If you don’t know what I’m talking about, you need to click on that link immediately. Seeing both Dan and Dave post on their respective blogs about the thought and rationale that goes into these activities is like a masters class in pedagogy, digital media, and user design.

The common thread that I really like about these tools is the clean and minimalist way they pose an idea, encourage a bit of play and intuition, and then get out of the way. Dan has talked about these ideas philosophically for a while, and seeing Dave make these happen is really exciting. They talk about this being the future of textbooks, but I am willing to wager that textbooks will get fidgety at displaying a task to a user atop a blank white screen. The trend has been so far in the other direction that I am skeptical, but I am hopeful that they will start to listen. These exercises are like a visit to the Museum of Modern Art. Textbooks and online learning otherwise tends to look either like a visit to Chuck-E-Cheese or the town library, over-thinking or under-thinking the power of aesthetics to creating a learning environment that is stimulating enough, but not distracting.

Being a committed Twitter follower, I of course interrupted their workflow with suggestions. I was looking for an easy way to collect student responses to a question along the lines of Activeprompt, but for tasks that are not about finding a location. I had posed a question to my Geometry class and was really excited about greasing the rails for gathering student responses and putting them in one place. This is the same idea as what Dan/Dave had done, but with a bit less of a framework pushing it in a direction.

Dave’s suggestion was, well, intimidating:

Screen Shot 2013-03-21 at 4.48.19 PM

I had been playing around with web2py, Django, Laravel, and other template frameworks that said they would make things easy for me, but it just didn’t click how they would do this. I have done lots of small Python projects, but the prospect of making a website seemed downright unlikely. I spent three hours putting together this gem using the CSS I had learned from CodeAcademy:
Screen Shot 2013-03-21 at 4.56.54 PM

I was not proud of this, but it was the best I thought I could do.

Through the power of Twitter, I was able to actually have a conversation with Dave and learn how he put his own work together. He uses frameworks such as Raphael.js and Sinatra in a way that does just enough to achieve the design goal. I learned that he wasn’t doing everything from scratch. He took what he needed from what he knew about these different tools and constructing precisely what he envisioned for his application. I prefer Python to Ruby because, well, I don’t know Ruby. I found Bottle which works beautifully as a small and simple set of tools for building a web application in Python, just as Dave had done with his tools.

Using Bottle and continuing to learn how it works, I made this yesterday.
BFwz3k5CQAEE2ts.png-large

I shared it with Dave, and he revealed another of his design secrets: Bootstrap. Again, dumbstruck by the fact this sort of tool exists, but also that I hadn’t considered that it might. This led me to clean up my previous submission and reconsider what might be possible. With a bit more tinkering, I turned this into what I had envisioned: a flexible tool for collecting and sharing student responses to a question
Screen Shot 2013-03-21 at 5.12.14 PM

I was just tickled pink. Dave had shown me his prototype for what he made in response to my prompt – I was blown away by it, as with the rest of his work. Today, however, I proudly used my web app with two of my classes and was happy to see that it worked as designed.

The point behind writing about this is not to brag about my abilities – I don’t believe there is anything to brag about here. Learning to code has gotten a good mix of press lately on both the positive and negative side. It is not necessarily something to be learned on its own, for its own sake.

I do want to emphasize the following:

  • My comfort with coding is developed enough at this point that I could take my idea for how to do something in the classroom using programming and piece it together so that it could work. I got to this point by messing around and leaving failed projects and broken code behind. This is how I learn, and it has not been a straight line journey.
  • If I was not in the classroom on a regular basis, I doubt I would have these ideas for what I could do with coding if I had the time to focus on it completely. In other words, if I ditched the classroom to code full time (which I am not planning to do) I would run out of things to code.
  • Twitter and the internet have been essential to my figuring out how to do this. Chatting virtually with Dave, as an example, was how I learned there was a better way than the approach I was taking. There are no other people in my real world circles who would have introduced me to the tools that I’ve learned about from Dave and other people in the twitterverse. Face to face contact is important, but it’s even better getting virtual face time with people that have the expertise and experience to do the things I want to learn to do.
  • I have been writing code and learning to code from the perspective of trying to do a specific and well defined task. This is probably the most effective and authentic learning situation around. We should be looking for ways to get students to experience this same process, but not by pushing coding for its own sake. As with any technology, the use needs to be defined and demanded by the task.
  • The really big innovations in ed-tech will come from within because that’s where the problems are experienced by real people every day. Outsiders might visit and see a way to help based on a quick scan of what they perceive as a need. I’m not saying outsiders won’t or can’t generate good ideas or resources. I just think that tools need to be designed with the users in mind. The best way to do this is to give teachers the time, resources, and the support to build those tools themselves if they want to learn how.

You can check out my code at Github here. Let me know if you want to give it a shot or if you have suggestions. This experiment is far from over.

A computational approach to modeling projectile motion, continued.

Here is the activity I am looking at for tomorrow in Physics. The focus is on applying the ideas of projectile motion (constant velocity model in x, constant acceleration model in y) to a numerical model, and using that model to answer a question. In my last post, I detailed how I showed my students how to use a Geogebra model to solve projectile motion.

Let me know what I’m missing, or if something offends you.


A student is at one end of a basketball court. He wants to throw a basketball into the hoop at the opposite end.

  • What information do you need to model this situation using the Geogebra model? Write down [______] = on your paper for any values you need to know to solve it using the model, and Mr. Weinberg will give you any information he has.
  • Find a possible model in Geogebra that works for solving this problem.
  • At what minimum speed he could throw the ball in order to get the ball into the hoop?

We are going to start the process today of constructing our model for projectile motion in the absence of air resistance. We discussed the following in the last class:

  • Velocity is constant in the horizontal direction. (Constant velocity model)
  • $latex x(t) = x_{0} + v t$

  • Acceleration is constant in the vertical direction (Constant acceleration model)
  • $latex v(t) = v_{0} + a t$
    $latex x(t)=x_{0}+v t +frac{1}{2}a t^2 $

  • The magnitude of the acceleration is the acceleration due to gravity. The direction is downwards.

Consider the following situation of a ball rolling off of a 10.0 meter high platform. We are neglecting air resistance in order for our models to work.
Screen Shot 2013-02-25 at 6.15.15 PM

Some questions:

  • At what point will the ball’s movement follow the models we described above?
  • Let’s set x=0 and y = 0 at the point at the bottom of the platform. What will be the y coordinate of the ball when the ball hits the ground? What are the components of velocity at the moment the ball becomes a projectile?
  • How long do you think it will take for the ball to hit the ground? Make a guess that is too high, and a guess that is too low. Use units in your answer.
  • How far do you think the ball will travel horizontally before it hits the ground? Again, make high and low guesses.

Let’s model this information in a spreadsheet. The table of values is nothing more than repeated calculations of the algebraic models from the previous page. You will construct this yourself in a bit. NBD.
Screen Shot 2013-02-25 at 6.39.23 PM

  • Estimate the time when the ball hits the ground. What information from the table did you use?
  • Find the maximum horizontal distance the ball travels before hitting the ground.

Here are the four sets of position/velocity graphs for the above situation. I’ll let you figure out which is which. Confirm your answer from above using the graphs. Let me know if any of your numbers change after looking at the graphs.

Screen Shot 2013-02-25 at 6.42.35 PM

Now I want you to recreate my template. Work to follow the guidelines for description and labels as I have in mine. All the tables should use the information in the top rows of the table to make all calculations.

Once your table is generating the values above, use your table to find the maximum height, the total time in the air, and the distance in the x-direction for a soccer ball kicked from the ground at 30° above the horizontal.

I’ll be circulating to help you get there, but I’m not giving you my spreadsheet. You can piece this together using what you know.


Next steps (not for this lesson):

  • The table of values really isn’t necessary – it’s more for us to get our bearings. A single cell can hold the algebraic model and calculate position/velocity from a single value for time. Goal seek is our friend for getting better solutions here.
  • With goal seek, we are really solving an equation. We can see how the equation comes from the model itself when we ask for one value under different conditions. The usefulness of the equation is that we CAN get a more exact solution and perhaps have a more general solution, but this last part is a hazy one. So far, our computer solution works for many cases.

My point is motivating the algebra as a more efficient way to solve certain kinds of problems, but not all of them. I think there needs to be more on the ‘demand’ side of choosing an algebraic approach. Tradition is not a satisfying reason to choose one, though there are many – providing a need for algebra, and then feeding that need seems more natural than starting from algebra for a more arbitrary reason.

What do I have wrong here? Computational thinking obsession continues

Another installment of my Hong Kong presentation titled ‘Why Computational Thinking matters.’ This is where my head is these days in figuring out how computers relate to what we do in class. My view is that activities like the one I describe in the video is more active than the way we (and I include myself in this group) usually attack word problems as part of our sequence.

[wpvideo IkQx3la4]

Help me flesh this out. I think there’s a lot here.

1 5 6 7 8 9 11